


Protective Hairstyles for Toddlers
Protective hairstyles for toddlers that are truly gentle: two-strand twists, loose braids, two puffs, loose Bantu knots, and a flat-twist front — all low-tension, pain-free, styled on damp, moisturized hair, protected at night with satin, and taken down after days, never weeks.
The gentlest protective hairstyles for toddlers are two-strand twists, loose three-strand braids, two puffs, small loose Bantu knots, and a flat-twist front — all styled on damp, moisturized, detangled hair, kept loose at the hairline with soft bands only, protected at night with satin, and taken down after a few days for rest days.

The short version
- Moisture first, always: styles are built on damp, leave-in-conditioned hair and detangled gently from the ends — never dry-pulled.
- Low tension is non-negotiable: loose at every root and hairline, edges left free, and the two-finger check at every band.
- Soft snag-free bands, doubled not tightened; no tight rubber, no metal clasps, no styles that need to hurt to hold.
- Satin does the night shift: a bonnet or satin pillowcase, then a morning refresh of spray and fingertips only.
- Days, not weeks: take styles down after two to five days, rest the hair loose, and see a clinician for any pain, bumps, redness, broken hair, or hair loss.
- Age
- Ages 3–4
- Prep
- 5 min
- Play time
- 30 min
- Mess
- Low
- Difficulty
- Easy
- Where
- Indoor
Why kids love this
Gentle protective hairstyles for toddlers do two jobs at once: they protect curly and coily hair from daily tangling, dryness, and breakage, and they give a three- or four-year-old a style she can admire in the mirror, touch proudly, and then forget about for days while she plays. Toddlers love these styles for honest reasons — twists swing, puffs bounce, knots feel like little crowns — and parents love them because one calm styling session replaces a week of morning battles with the comb. Done the way this guide teaches, styling is never a struggle to endure: hair is moisturized and detangled gently in small sections, every style sits loose at the hairline with room to move, soft bands do the holding instead of tension, and the child holds real power throughout, from choosing the style to calling the stop word that pauses everything. A satin bonnet turns bedtime into part of the routine, a spray-bottle refresh takes two minutes in the morning, and takedown day is its own gentle ritual followed by rest days before the next style. Her hair is celebrated exactly as it grows — thick, curly, coily, and beautiful — and the style is simply a kind frame around it.
What you'll need
- Wide-tooth comb — wide spacing glides through curls without snagging; it works on damp, conditioned hair only, never dry
- Spray bottle filled with plain water — the moisture tool for styling, morning refreshes, and takedowns (blank, unlabelled bottle)
- Leave-in conditioner — a creamy, slippery formula that softens and adds slip for detangling (blank, unlabelled container)
- Soft snag-free bands — smooth, seamless, no metal clasps, no tight rubber; they hold by wrapping, not by squeezing
- Satin bonnet — soft satin, with a satin pillowcase as the backup for bonnet-escapers; cotton pillowcases pull moisture and create friction
- Section clips — large, smooth clips to hold finished sections out of the way while you work (blank, unlabelled container for bands and clips)
- A small mirror she can hold, a favorite soft toy, and a snack — the comfort kit that makes sitting still possible
Before you start
Choose the style together from the five in this guide — twists (step 4), braids (step 5), two puffs (step 6), Bantu knots (step 7), or the flat-twist front (step 8) — and let her final pick win. Pick a rested, fed, unhurried time of day; styling a tired or hungry toddler teaches her to dread hair day, and hair day should feel like care. Wash or thoroughly dampen and condition the hair beforehand if it is dry or tangled — every style here starts from clean, moisturized, detangled hair, never from dry pulling.
How to do it
-
Set up the hair station. Make the styling spot somewhere she already likes being — a comfy seat at her height, a cushion, her soft toy in her lap, a small mirror she can hold, and a snack and drink within reach; lay out the comb, spray bottle, leave-in conditioner, bands, and clips on the tray where she can see every tool before it touches her head, because no surprises is the first comfort rule. Keep entertainment short and calm — a favorite song, a story you tell, looking out the window together — rather than zoning out in front of a long video, so she stays present and can tell you how things feel. Then agree the stop word before the first spray: a word or a raised hand that means pause, everything stops, hands come away, and she decides when you start again. Say, "This is your hair, and you are the boss of it — if you say stop, we stop, every single time." A toddler who trusts the stop word sits longer, cooperates more, and learns that her comfort outranks any hairstyle.

-
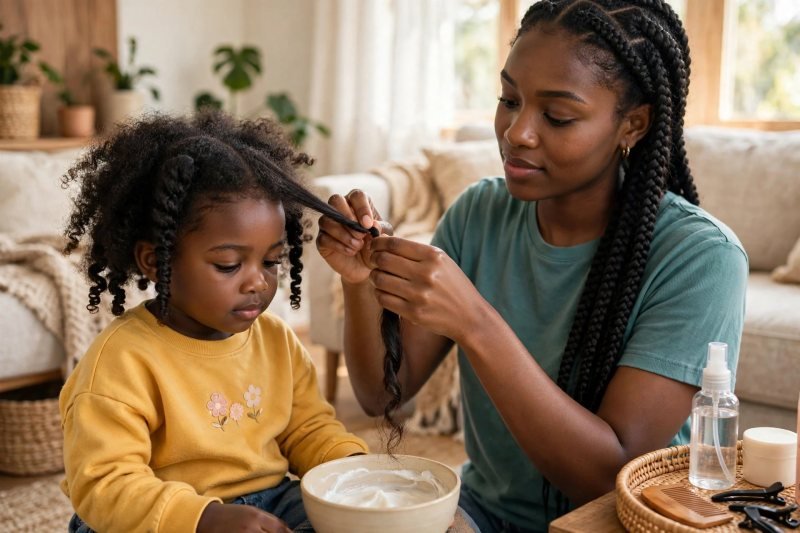
Start with moisture. Protective styles are built on damp, moisturized hair and are undone by dry hair, so begin by misting each part of her hair with the spray bottle until it is evenly damp and springy — not dripping, never dry — then work a small amount of leave-in conditioner through with your fingers, smoothing it down the lengths and letting her feel how soft her curls go. Style hair in this damp, conditioned state only; pulling a comb or a twist through dry curls is where breakage and tears both start. This gentle-care moment pairs naturally with the rest of her routine — families who follow a simple kids skincare routine will recognize the same principle at work: gentle products, unhurried hands, and skin and hair treated as things to care for, not problems to fix. Say, "First we give your hair a drink — soft hair is happy hair, and we only style happy hair." Let her do a spray or two herself; toddlers who help with the misting settle noticeably faster.

-
Detangle gently. Work in four to six small sections, clipping the rest out of the way, and detangle one section at a time with patience as the technique: fingers first, teasing apart any knots and shedding loose hairs gently by hand; then the wide-tooth comb, starting at the very ends and working upward in short steps, holding the hair above the comb with your other hand so no pull ever reaches her scalp. Add more water and a little more leave-in whenever a section resists — slip is what makes detangling painless, not force — and never rip through a tangle to save time, because the two minutes saved cost her trust in the whole process. If a knot truly will not release, work conditioner into it, wait, and try again with fingers alone. Say, "We start at the ends and sneak up on the tangles — they never even know we are coming." When all sections are smooth, soft, and separated, styling itself becomes the quick, easy part.

-
Two-strand twists — the starter protective style. Take a small section of detangled, damp hair — roughly the width of your thumb is plenty at this age — divide it in two, and twist the two parts around each other from root to end, keeping your hands relaxed so the twist lies soft and rope-like rather than wound tight; let the ends curl together, adding a tiny dab of leave-in if they need encouragement, and move on section by section until her whole head is in neat, swingy twists. Keep every twist loose at the root and well away from pulling at the hairline; the style should move when she shakes her head, and she should be able to smile, frown, and raise her eyebrows without feeling a thing. This is a lovely step for little helping hands — holding the next section ready, passing you clips, and counting twists together are real fine motor activities in disguise, all grip, pinch, and patience. Say, "Two pieces, round and round, soft and swishy — like little ropes we made together." Twists are the gentlest first protective style: no bands required, nothing to sleep uncomfortably on, and an easy takedown.

-
Simple three-strand braids (plaits). For a style that holds a little more structure, braid a section in the classic three-strand way — divide the damp, detangled section into three parts and cross the outer parts over the middle in turn, keeping your grip deliberately loose at the root so the braid starts soft and only firms up down its length; a braid that is tight at the scalp is a braid to undo and redo looser, full stop. Finish each braid with a soft snag-free band wrapped gently at the end, never close to the scalp, and keep the delicate edges and baby hairs at the hairline completely free — they are not part of the braid, and sweeping them in is how hairlines get stressed. Work around her head in a simple pattern she can follow in the mirror: two braids, four braids, or a crown of small ones, all at the same gentle tension — which is to say, barely any. Say, "Over, over, over — soft at the top, swishy at the bottom, and your edges stay free and fuzzy just like they should." If she fidgets halfway, a half-head of braids and a break is a complete success, not a compromise.

-
Two puffs. Part the detangled hair gently down the middle — fingers or the wide end of the comb, following her natural part where she has one — gather one side up softly with your hands and a brush-free smoothing of your palms, and secure it with a soft snag-free band that is doubled over the hair, not tightened down onto it: the band wraps just enough times to hold the puff in place, and then you stop, even if one more wrap feels tidier. Run the two-finger check every single time — two of your fingers should slide comfortably between the band and her scalp — and fluff the puff open with your fingertips so the hair stands in a soft cloud rather than pulling toward the band. Repeat on the other side, match them roughly in the mirror together, and accept charming asymmetry as the correct toddler finish. Say, "Two puffs, soft and round — and we always leave room for two fingers, because puffs should bounce, not pull." Puffs are the fastest style in this guide and the one most toddlers ask for by name.

-
Bantu knots. For a playful day style, take a small section of damp, detangled hair, twist it gently into a loose rope as in step 4, then coil that rope around its own base into a small knot, tucking the end under or securing it with the softest possible band — small, loose coils that sit on the head like little buttons, never wound tight, never pulled into place. The tension test is simple and absolute: if she says it hurts, winces, or keeps reaching for one, that knot comes straight out and gets recoiled looser or left as a twist instead; a knot that needs to hurt to stay is a knot made wrong. Keep knots to a handful rather than a whole head of tiny ones at this age, leave the hairline sections as loose twists or puffs instead, and remember knots are a day style here — take them down or loosen them before a long nap if they press when she lies on them. Say, "Little knots, soft and squishy — and if one feels ouchy, out it comes, no questions." Undone the next day, yesterday's knots leave behind soft waves she can wear loose.

-
Flat-twist front. This is the dressed-up finish: along the front, take a wide, shallow section of damp hair just behind the hairline — never the fragile edge hairs themselves — divide it in two, and flat-twist it back by crossing the two parts over each other while picking up a little more hair with each cross, your fingers traveling loosely so the twist lies flat against the head without any downward pull. Do one on each side for a symmetrical frame, secure each end softly where it meets the hair behind, and style the rest as puffs or loose twists, so the front looks polished while the hairline itself stays completely unstressed — the twist sits behind the edges, holding nothing tighter than its own weight. Check in often during this step, because a flat twist can creep tighter than a free twist without looking it; her face should stay relaxed and she should forget it is there within a minute. Say, "Two soft twists like a headband your own hair made — pretty in front, and your edges are just resting." If flat-twisting is new to you, practice the motion on your own hair or a doll first; loose and slightly imperfect beats tight and neat every time.

-
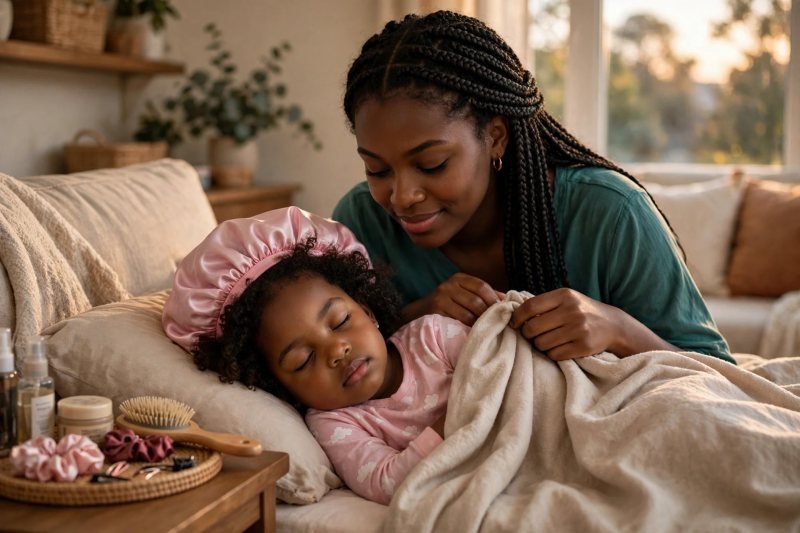
Protect it at night. A protective style only protects if the night shift does its job, so make the satin bonnet part of the bedtime routine from the very first styling day: hair goes under a soft satin bonnet — smooth side in, elastic gentle, sized so it stays on a small head without squeezing — or she sleeps on a satin pillowcase and bonnet for kids, which is also the honest solution for toddlers who remove every bonnet by midnight. Cotton pillowcases wick moisture out of curls and rough them with friction; satin lets hair glide, so twists stay neat, puffs keep their shape, and mornings stop meaning a full restyle. In the morning, refresh only: lift the bonnet, mist lightly with the spray bottle, and smooth with fingertips alone — a fingertip fluff for puffs, a gentle palm-smooth for twists — with no comb, no re-braiding, and no daily restyling, because the whole point of the style is that her hair gets left alone for days. Say, "Your bonnet is your hair's pajamas — on at night, and in the morning we just wake the style up with a little mist." Build the bonnet into the same story-and-song sequence every night and resistance usually melts within the week.
-
Take down, rest, and watch for red flags. At this age, protective styles last days, not weeks — plan on two to five days for twists, braids, puffs, and knots, then take the style down even if it still looks tidy, because toddler scalps and hairlines are not built for long wear. Takedown is a style session in reverse and gets the same gentleness: work conditioner onto your fingers, uncoil and unwind each twist, braid, or knot slowly by hand, mist as you go, finger-detangle the shed hairs out — shedding that has been held in the style for days looks like a lot and is usually just several days' worth at once — then wash, condition, and let her hair rest completely loose for at least a day or two between styles. Rest days are also trim days in many families: if the ends look thin or a shape-up is due, the calm guidance in the toddler first haircut walkthrough makes that appointment easy to prepare for. Most importantly, watch for red flags at every takedown and styling: stop the style, leave the hair loose, and see a pediatrician or pediatric dermatologist for pain that lingers, bumps, redness, swelling, broken hair, patches of hair loss, or a scalp that does not settle — and never push through a style she says hurts. Say, "Styles visit for a few days, then your hair rests — and if anything ever hurts or looks sore, we stop and a doctor helps us." Pain is never part of the style, not during, not after, not for beauty, not ever.


Make it easier
Start with exactly one style — two-strand twists (step 4) need no bands, no parting skill, and no mirror-checking; master them before adding braids or flat twists. Style in two short sittings: detangle and twist half the head, take a real break, then finish — a toddler's patience, not your plan, sets the schedule. Keep a standing hair tray packed — comb, spray bottle, leave-in, bands, clips, bonnet — so styling starts in one minute instead of a scavenger hunt.
Make it harder
Add the flat-twist front (step 8) to twists or puffs once your hands are confident — it is the one genuine technique upgrade in the guide, and loose is still the rule. Let her direct the pattern: choosing where the puffs sit, how many braids, and which style comes next builds planning, counting, and a four-year-old's very serious creative direction. Teach the morning refresh as her job: bonnet off, two mists from the spray bottle, fingertip fluff — a small, real responsibility in hair care that is hers alone.
Other ways to play it
- Two puffs into space buns: the step-6 puffs, gathered a touch higher and coiled softly once — same soft bands, same two-finger check, worn for the day and loosened at night.
- Twist-out day: yesterday's twists, gently uncoiled with conditioned fingers, become a soft, defined loose style for a day before wash day — a free second style from the first one's work.
- Bonnet-escape version: for the toddler no bonnet survives, the satin pillowcase does the whole night job alone, and styles are refreshed with spray and fingertips in the morning as usual.
How it changes by age
- Age 3: Threes get the simplest versions: two-strand twists, two puffs, and a few loose Bantu knots for a day. Sessions stay short — detangle and style in stages with breaks, the stop word honored instantly — and styles come down after two to four days. Braids are loose and few; flat twists are parent-practice-only or skipped. Her jobs are real but sized right: holding the mirror, spraying the water, choosing between two styles you offer.
- Age 4: Fours can sit a little longer, choose and even plan their style ("puffs Monday, twists Friday"), help hold sections, pass clips, and learn the morning refresh as their own routine. Braids and the flat-twist front join the rotation, still loose at every root, still down after a few days, and still with rest days between styles. A four-year-old who can say "too tight" — and be believed instantly — has learned the most important hair lesson in this guide.
What they're learning
Body autonomy and consent: the stop word that always works, styles she chooses, and "too tight" believed on the spot — her body, her say, practiced weekly. Patience and sequencing: moisture, then detangle, then style, then bonnet — a four-step care routine she can recite, predict, and eventually partly run herself. Fine motor practice: spraying, holding sections, passing clips, and fluffing puffs — grip, aim, and two-handed coordination woven into real life. Pride and identity: her curls and coils celebrated as they grow, styled with knowledge and care — hair as heritage and joy, never as a problem to fix.
Clearing up
Bands go back into their container (count them as they come out at takedown — a missing band is usually hiding in a twist), clips and comb are rinsed and dried on the tray, the spray bottle is topped up with fresh water, and shed hair from detangling goes straight in the bin. The bonnet lives on its bedtime hook or pillow so it is findable at the tired end of the day, and the tray goes back to its shelf stocked — the next hair day starts calm because this one ended tidy.
Questions parents ask
What are the best protective hairstyles for toddlers?
How long should a protective style stay in a toddler's hair?
How can you tell if a toddler's hairstyle is too tight?
How do you protect a toddler's protective style at night?
Can protective hairstyles damage a toddler's hair?
For mixed-texture hair, the biracial hair care for kids guide covers wash-day routines that pair with these styles. For day-to-day care of Black toddler hair, see natural hair care for Black toddlers. Style-count verification: the guide teaches five named styles, each in its own step — two-strand twists (step 4), three-strand braids (step 5), two puffs (step 6), Bantu knots (step 7), flat-twist front (step 8) — framed by setup, moisture, and detangling (steps 1–3) and night protection plus takedown and red-flag guidance (steps 9–10). Hair-care discipline (per wave spec): low-tension, pain-free framing throughout; no diagnosis or cure promises; red-flag symptoms routed to a pediatrician or pediatric dermatologist; standard guidance only. Zero brands, zero prices; all containers blank and unlabelled in text and imagery.

save it for later
Pin this for the next rainy afternoon
Keep it on a board so it is there when you need it, rather than when you happened to find it.
Save to Pinterest


